środa, 1 listopada 2017

Glam Macramé Rondelle Bracelet - TUTORIAL

by Anna Krawczyk - bluebirdbeads.blogspot.com


MATERIALS:
-          38 Rondelle beads 6mm x 4mm
-          cotton macramé cord waxed (not thicker than 1mm)
-          clasp of your choice (lobster swivel clasp in this case)
-          few jump rings (3-7)
-          charm of your choice
-          small scissors
-          jewelry pliers 


1. Cut two pieces of cord: one of about 70cm and one of minimum 160cm


2. Fold the shorter cord in half and string one jump ring on it.


3. Make a knot on a longer piece of cord and place it around the shorter cord. Tighten the knot, so that the left side of the long cord is about 30cm longer than the right one. We need this, as we will string our Rondelle beads only on this longer cord. I put the names on the picture below for easier understanding. 


4. Now we are going to start with square macramé knot, a basic knot that we will use till the end of our work. Place the long cord under the base cord and over the short cord.


5. Take the end of the short cord and put it over all other cords inside the loop on the left side.


6. Pull on both long and short cord to tighten the knot.


7. Now we have a long cord on the right side and short one on the left side. Again place the long cord under the base cord and over the short cord. 


8. Take the end of the short cord and put it over all other cords inside the loop on the right side. Pull on both long and short cord to tighten the knot. The long cord is back on the left side. We will be repeating the same steps (4-8) all over, we will just add Rondelle beads later on.


9. Repeat steps 4 to 8 once more. You should now have something similar to the small picture below.


10. Now let’s make our life easier and tie a small knot on the short cord, as we will be stringing Rondelle beads only on the long cord. This is only not to confuse the cords.


11. String the Rondelle bead on the long cord and move it all the way up.


12. Proceed with macramé knot exactly like before - place the long cord under the base cord and over the short cord.. 


… and put the short cord over all other cords inside the loop – tighten the knot.


13. Now the long cord is on the right side and it is time to string another Rondelle (and move it up the cord).


14. Repeat the step no 7 (place the long cord under the base cord and over the short cord).


15. Come back with the short cord over other cords inside the loop and tighten the knot.


16. Repeat from the step no 11 to step no 15 until you have desired length of the bracelet. 


17. After we reached our desired length of the bracelet we need to string the clasp on the base cord. If the clasp does not go with the jump ring, we need to attached it first.


18. Now we fold our base cord and place the straps beneath the bracelet.


19. We proceed with standard square macramé knot including folded base cords inside to close our bracelet.


20. Tie the knot and repeat the whole circle two times (that means the long cord on which we were stringing the beads is back on the left side).


21. Turn the bracelet and pull the base cords till desired length (about 5mm from the knots). 


22. Using long and short cord tie a simple knot, so that it is inside the base cords. The long cord will be on the right side and the short cords on the left side after that.


23. String the Rondelle beads on the cords and make a simple knot, so that the length of the cords is about 3-4cm.


24. Cut the base cord and both side cords. You can use the translucent glue to protect the knots at this point, but it is not really necessary. 


25. Attach as many jump rings as you see fit to the ring on the beginning of the bracelet and attach the charm in the end. It will help putting on the bracelet and because of the rings it will be possible to adjust the size.  


26. Make at least two bracelets in different colours, as they look great together. Have fun and let me know if you have any questions.


 I hope you will find this tutorial helpful. Please share pictures of your Glam Macramé Rondelle Bracelet - bluebirdbeads.blogspot.com


poniedziałek, 7 sierpnia 2017

Bransoletka Red Sky - Red Sky Bracelet


Dzisiaj w słonecznym wakacyjnym klimacie bransoletka ze sznura koralikowego. Prosta, super wygodna i pięknie mieni się w świetle.

Today in a sunny vacation vibe I am presenting the bead crocheted bracelet. Simple, super-comfortable and lovely sparkling in the light.


Ze względu na spore oddalenie od domu i mojego "studia" postanowiłam poeksperymentować z plenerem :) 
I jak.. ?

Since I'm far far away from home and my "studio" I decided to experiment a little with an open air photos :) What do you think.. ?


czwartek, 27 lipca 2017

TUTORIAL - JAK W PROSTY SPOSÓB POPRAWIĆ JAKOŚĆ SWOICH ZDJĘĆ BIŻUTERII


Anna Krawczyk - bluebirdbeads.blogspot.com


CZĘŚĆ 1: stworzenie namiotu bezcieniowego z tego co masz w domu 

MATERIAŁY:
-          karton
-          ostry nóż lub nóż do tapet
-          taśma klejąca
-          biały papier śniadaniowy
-          marker lub długopis

-          biały (lub w innym kolorze) arkusz brystolu A4 / A3 / A2 (w zależności od wielkości namiotu)


1. Wytnij jedną ze ścian kartonu.


2. Na trzech sciankach narysuj prostokąty, zostawiając wystarczający margines  (około 1.5-2cm) żeby konstrukcja była wystarczająco mocna po wycięciu środka. Upewnij się, że arkusze papieru śniadaniowego są wystarczająco duże aby zakryć te prostokąty.


3. Wytnij prostokąty ostrym nożem lub nożem do tapet.


Tak to powinno wyglądać po tym kroku:


4. Na ramy powstałe po wycięciu prostokątów naklej arkusze papieru śniadaniowego. Upewnij się, że jest równy (nie musi być idealnie – byle nie było zmarszczek, które mogłyby powodować cienie).


5. W razie potrzeby możesz wzmocnić części ramy taśmą klejącą lub dodatkowym kawałkiem kartonu.


6. Twój namiot bezcieniowy jest prawie gotów


7. ...dodaj tylko tło w wybranym kolorze.


To naprawdę robi różnicę - przykłady:

Lepsze odwzorowanie kolorów:


Łagodniejszy gradient światła (1), mniejsze i delikatniejsze cienie (2):

(zdjęcia bez obróbki, zrobione w pochmurny dzień bez dodatkowego światła)

Jednostajne rozproszenie światła, więcej refleksów na przedmiocie:


1. zdjęcie na białym papierze bez namiotu bezcieniowego 
2. zdjęcie zrobione w namiocie bezcieniowym 
3. zdjęcie zrobione w namiocie bezcieniowym dodatkowym trickiem*
1                                                           2                                                        3 
(zdjęcia bez obróbki, zrobione w pochmurny dzień bez dodatkowego światła)
trick –  weź dodatkowy kawałek brystolu lub prostokąt, wycięty z kartonu. Owiń go folią aluminiową i używaj do odbijania światła w kierunku Twojego obiektu. Sprawdź różne kąty nachylenia, aby uzyskać różne efekty oświetlenia.


Aby przekonać się o tym jaką różnicę robi namiot bezcieniowy obejrzyj moje zdjęcia z 2015 i 2016 do maja i jak poprawiły się one później.

Mam nadzieję, że podobał Ci się ten tutorial. Czekam na Twój komentarz na:  bluebirdbeads.blogspot.com

Wkrótce następna część tutoriala (podstawowa obróbka zdjęć).


czwartek, 20 lipca 2017

TUTORIAL - HOW TO EASILY IMPROVE YOUR JEWELLERY PICTURES QUALITY


by Anna Krawczyk - bluebirdbeads.blogspot.com


PART 1: making a lightbox from what you have at home

MATERIALS:
-          cardboard box
-          sharp knife or wallpaper trimming knife
-          scotch tape
-          white sandwich paper
-          marker or a ball pen
-          white or other color A4 / A3 / A2 Bristol board (depending on the box size)


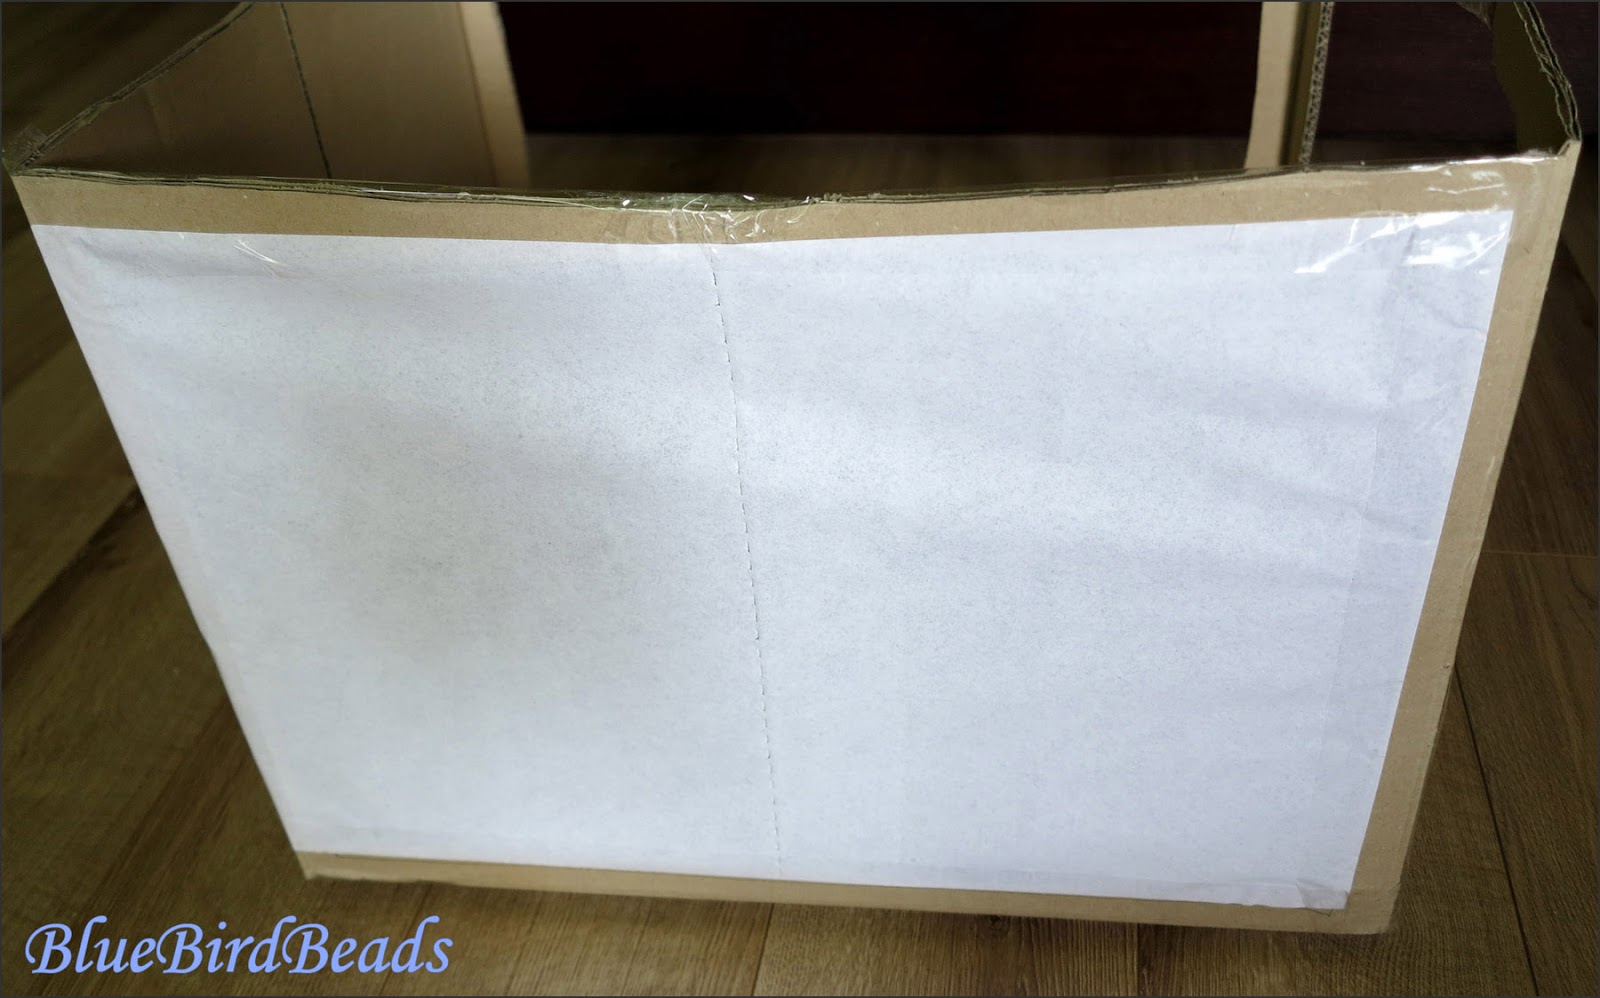
1. Cut out one of the walls of the cardboard box.


2. Draw the rectangles on three walls of the box, leaving enough margin (about 1.5-2cm) to keep construction strong enough after you cut out the inside. Make sure the sheets of sandwich paper are big enough to cover those rectangles.


3. Cut out the rectangles with a sharp knife or a wallpaper trimming knife.


That is what you should get after this step:


4. Stick the sandwich paper to the frames using scotch tape. Make sure that it is even (does not have to be perfect – just no wrinkles that could cause the shadows). 


5. You may want to strengthen some parts of the frame with the scotch tape or even additional cardboard if necessary.


6. Your lightbox is almost ready…


7. ...just add the background (the more it covers the back wall of the lightbox the better).


It really makes a difference – examples:

Better image of colors:


Softer gradient of light (1), smaller and softer shadows (2):

(pictures without edition taken on a cloudy day with no additional light)

Even distribution of light, more reflexes:


1. picture on a white paper made outside the lightbox     
2. picture made inside the lightbox        
3. picture made lightbox using small tip*
1                                                           2                                                        3 
(pictures without edition taken on a cloudy day with no additional light)
* tip – take additional sheet of Bristol paper or one of the rectangles that you cut out of the box. Wrap it in the aluminum foil and use it to reflect additional light towards your object. Play a little with various angles to find the best effect.


For more examples on how the lightbox makes a difference check my pictures from 2015 and 2016 until May and how they improved after.

I hope you will find this tutorial helpful. 
Let me know how you did your lightbox at bluebirdbeads.blogspot.com

Stay tuned, as the second part is coming soon (basics of photo edition).


sobota, 17 czerwca 2017

Dwustronna bransoletka ze wstążeczką - Two-sided bracelet with bow charm

Prosta dwustronna bransoletka typu Caterpillar w złocie i zieleni. Uroku dodaje jej charms w postaci wstążeczki, która pasuje do obu stron bransoletki. 

Simple two-sided Caterpillar bracelet in gold and green. Cute bow charm suits both sides of the bracelet.

Bow charms


Bow charms


Bow charms


bow charms

Wzór, którego użyłam możecie znaleźć tutaj. The pattern I used can be found under this link.


piątek, 9 czerwca 2017

Czarny Agat w czerwonym ubranku - Black Agate in red setting

Długo mnie nie było ale to nie znaczy, że nic nie robiłam :)
Z czterech projektów zrobionych na zamówienie udało mi się sfotografować tylko jeden ukończony wisior. Wyzwanie było spore, bo miałam zrobić 4 wisiory w 7 dni i to jeszcze według konkretnych wymagań kolorystycznych i stylistycznych. Jakoś się udało, ale na zdjęcia już czasu nie starczyło.
Postępy prac można obejrzeć tutaj: https://www.facebook.com/BlueBirdAnna/photos/pcb.264051234060601/264051210727270/?type=3&theater
https://www.facebook.com/BlueBirdAnna/photos/pcb.263689197430138/263689180763473/?type=3&theater

Long time no post, but I was not being lazy :)
I had an order for four pendants, from which I managed to photograph only one. It was a bit of a challenge, as I had to create 4 pendants in 7 days, and according to specific colour and style demands. I managed somehow, however there was not time left for pictures.
The progress of the work is pictured here:
https://www.facebook.com/BlueBirdAnna/photos/pcb.264051234060601/264051210727270/?type=3&theater
https://www.facebook.com/BlueBirdAnna/photos/pcb.263689197430138/263689180763473/?type=3&theater


Black Agate